Flutter 在经过一番洗礼后终于迎来了 Release Preview 1版本,也吸引了更多人的关注。使用 Flutter从头开始写一个 App非常轻松,但越来越多的人发现 Flutter貌似并不很友好地支持现有的 App接入。所以本文带大家了解一下如何让现有 App支持 Flutter。
环境
Flutter:0.5.1
Xcode 9.4.1
Flutter工程:flutter/examples/hello_world
Debug: Flutter Hot Restart
我们都知道在开发环境下,Flutter的 hot restart 对 UI快速成型是非常有帮助的,要让现有的 App支持 Flutter并且开启 Hot restart也不难。
下文假定你的工程文件是 YourApp.xcodeproj
Flutter(engine) 基础库
首先,在你的项目里面拖入 Flutter.framework,这个库是 Flutter Engine,承载了 Dart运行时和绘图引擎。Flutter.framework和命令行工具版本是一一对应的,如果你不知道从哪里找这个文件,可以直接在 Flutter源码项目里面进行一次 flutter run,然后你就能在 /<project>/ios/Flutter/目录下面找到了,直接拖进项目即可。
Flutter ViewController
接下来需要把 Flutter的基础代码引入现有工程,有了基础的 Flutter ViewController才可以显示 Flutter视图。这一步很简单,只需要在你现有的 ViewController中 Push过去就可以了:
1
2
3
4
| - (void)jumpToFlutter {
FlutterViewController *viewController = [FlutterViewController new];
[self.navigationController pushViewController:viewController animated:YES];
}
|
但是还需要注意需要把 AppDelegate里面的生命周期事件传递给 Flutter
Release Preview 1后文档中提到有 FlutterAppLifeCycleProvider这个协议,但是 0.5.1还没有,所以这里先野路子来了
直接让现有的 AppDelegate继承 FlutterAppDelegate即可,但这带来的负面影响是 root ViewController被设置为 Flutter ViewController
自行改造 AppDelegate。很多中大型 App喜欢在开发中将业务模块化,幸好 Flutter APPDelegate并不是很难改造过来,也能支持模块 Delegate。首先让你的 Delegate遵循 FlutterPluginRegistry协议
1
2
3
4
5
6
7
8
9
10
11
12
13
14
15
16
17
18
19
20
21
|
@interface DemoFlutterBaseAppDelegate : NSObject <ModularApplicationDelegate, FlutterPluginRegistry>
- (NSObject<FlutterBinaryMessenger> *)binaryMessenger;
- (NSObject<FlutterTextureRegistry> *)textures;
@end
|
然后在实现中支持 Flutter messenger 和 texture
1
2
3
4
5
6
7
8
9
10
11
12
13
14
15
16
17
18
19
20
21
22
23
24
25
26
27
28
29
30
31
32
33
34
35
36
37
38
39
40
41
42
43
44
45
46
47
48
49
50
51
52
53
54
55
56
57
58
59
60
61
62
63
64
65
66
67
68
69
70
71
72
73
74
75
76
77
78
79
80
81
82
83
84
85
86
87
88
89
90
91
92
93
94
95
96
97
98
99
100
101
102
103
104
105
106
107
108
109
110
111
112
113
114
115
116
117
118
|
@interface DemoFlutterAppDelegateRegistrar : NSObject<FlutterPluginRegistrar>
@property(nonatomic, copy) NSString *pluginKey;
@property(nonatomic, strong) DemoFlutterBaseAppDelegate *appDelegate;
- (instancetype)initWithPlugin:(NSString*)pluginKey appDelegate:(DemoFlutterBaseAppDelegate*)delegate;
@end
@implementation DemoFlutterAppDelegateRegistrar
- (instancetype)initWithPlugin:(NSString*)pluginKey appDelegate:(DemoFlutterBaseAppDelegate*)appDelegate {
self = [super init];
NSAssert(self, @"Super init cannot be nil");
_pluginKey = [pluginKey copy];
_appDelegate = appDelegate;
return self;
}
- (NSObject<FlutterBinaryMessenger>*)messenger {
return [_appDelegate binaryMessenger];
}
- (NSObject<FlutterTextureRegistry>*)textures {
return [_appDelegate textures];
}
- (void)publish:(NSObject*)value {
_appDelegate.pluginPublications[_pluginKey] = value;
}
- (void)addMethodCallDelegate:(NSObject<FlutterPlugin>*)delegate
channel:(FlutterMethodChannel*)channel {
[channel setMethodCallHandler:^(FlutterMethodCall* call, FlutterResult result) {
[delegate handleMethodCall:call result:result];
}];
}
- (void)addApplicationDelegate:(NSObject<FlutterPlugin>*)delegate {
[_appDelegate.pluginDelegates addObject:delegate];
}
- (NSString*)lookupKeyForAsset:(NSString*)asset {
return [FlutterDartProject lookupKeyForAsset:asset];
}
- (NSString*)lookupKeyForAsset:(NSString*)asset fromPackage:(NSString*)package {
return [FlutterDartProject lookupKeyForAsset:asset fromPackage:package];
}
@end
@interface DemoFlutterBaseAppDelegate ()
@property(nonatomic, strong) DemoFlutterBaseViewController *rootController;
@property(readonly, nonatomic) NSMutableArray* pluginDelegates;
@property(readonly, nonatomic) NSMutableDictionary* pluginPublications;
@end
@implementation DemoFlutterBaseAppDelegate
- (BOOL)application:(UIApplication *)application didFinishLaunchingWithOptions:(NSDictionary *)launchOptions {
for (id<FlutterPlugin> plugin in _pluginDelegates) {
if ([plugin respondsToSelector:_cmd]) {
[plugin application:application didFinishLaunchingWithOptions:launchOptions];
}
}
return YES;
}
#pragma mark - getters for flutter
- (FlutterViewController *)rootController {
}
- (NSObject<FlutterBinaryMessenger> *)binaryMessenger
{
if ([self.rootController conformsToProtocol:@protocol(FlutterBinaryMessenger)]) {
return (NSObject<FlutterBinaryMessenger> *)self.rootController;
}
return nil;
}
- (NSObject<FlutterTextureRegistry> *)textures
{
if ([self.rootController conformsToProtocol:@protocol(FlutterTextureRegistry)]) {
return (NSObject<FlutterTextureRegistry> *)self.rootController;
}
return nil;
}
- (NSObject<FlutterPluginRegistrar>*)registrarForPlugin:(NSString*)pluginKey {
NSAssert(self.pluginPublications[pluginKey] == nil, @"Duplicate plugin key: %@", pluginKey);
self.pluginPublications[pluginKey] = [NSNull null];
return [[DemoFlutterAppDelegateRegistrar alloc] initWithPlugin:pluginKey appDelegate:self];
}
- (BOOL)hasPlugin:(NSString*)pluginKey {
return _pluginPublications[pluginKey] != nil;
}
- (NSObject*)valuePublishedByPlugin:(NSString*)pluginKey {
return _pluginPublications[pluginKey];
}
@end
|
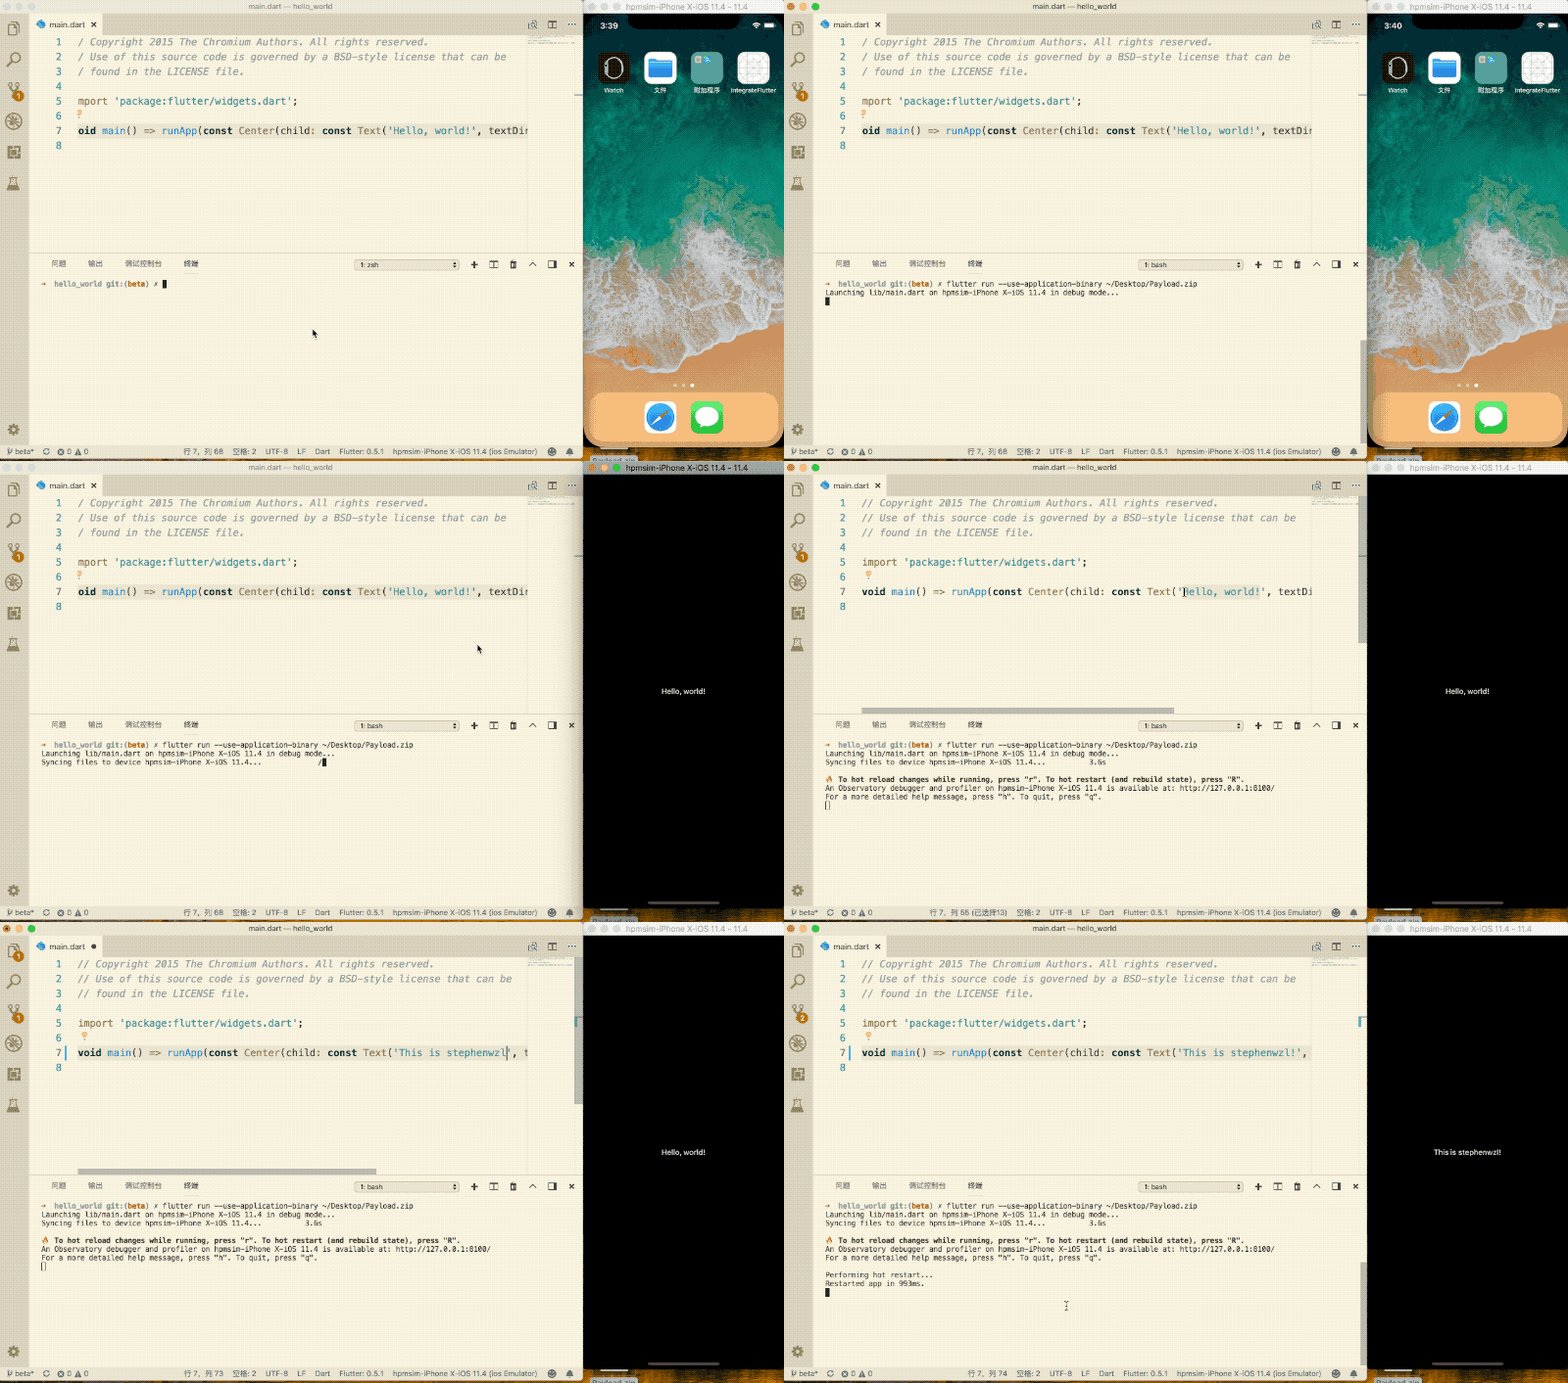
这样 Flutter的运行环境其实就准备好了,无论是 Hot Restart还是 AOT都可以支持。接下来我们实现 Debug Hot Restart
首先在你的 Flutter代码目录下执行一遍 Flutter build bundle,这可以帮助我们打包出一个 Flutter Asset,然后把这个 flutter_assets 目录拖入项目。
对你的项目进行一次 build,确保能够得到一个 .app 文件。然后新建一个文件夹叫做 Payload,把 .app文件放入 Payload文件夹,然后压缩成 zip文件。这个文件便可以被 Flutter命令行工具使用了。
1
| flutter run --use-application-binary /path/to/Payload.zip
|
然后效果如图:

其实这里并没有实现 Hot Reload,主要是目前 flutter工具链支持度还不好,不过 Hot Restart也够用了。
Release: Flutter AOT
Release模式和 Debug下不一样,我们需要做几件事情:
- 把
Flutter.framework替换成 flutter/bin/cache/artifacts/engine/ios-release/Flutter.framework,因为上一步我们用的库其实是 JIT Runtime
- 在 Flutter代码项目下面执行
flutter build aot --release --target-platform ios --ios-arch armv7,arm64 然后我们可以在 build目录下拿到一个打包好的 App.framework,不过别忘记在里面放一个 Info.plist。并且把这个库拖到工程里面
- 删除工程里面的
flutter_assets文件夹下的 isolate_snapshot_data、kernel_blob.bin、platform.dill、vm_snapshot_data这几个文件
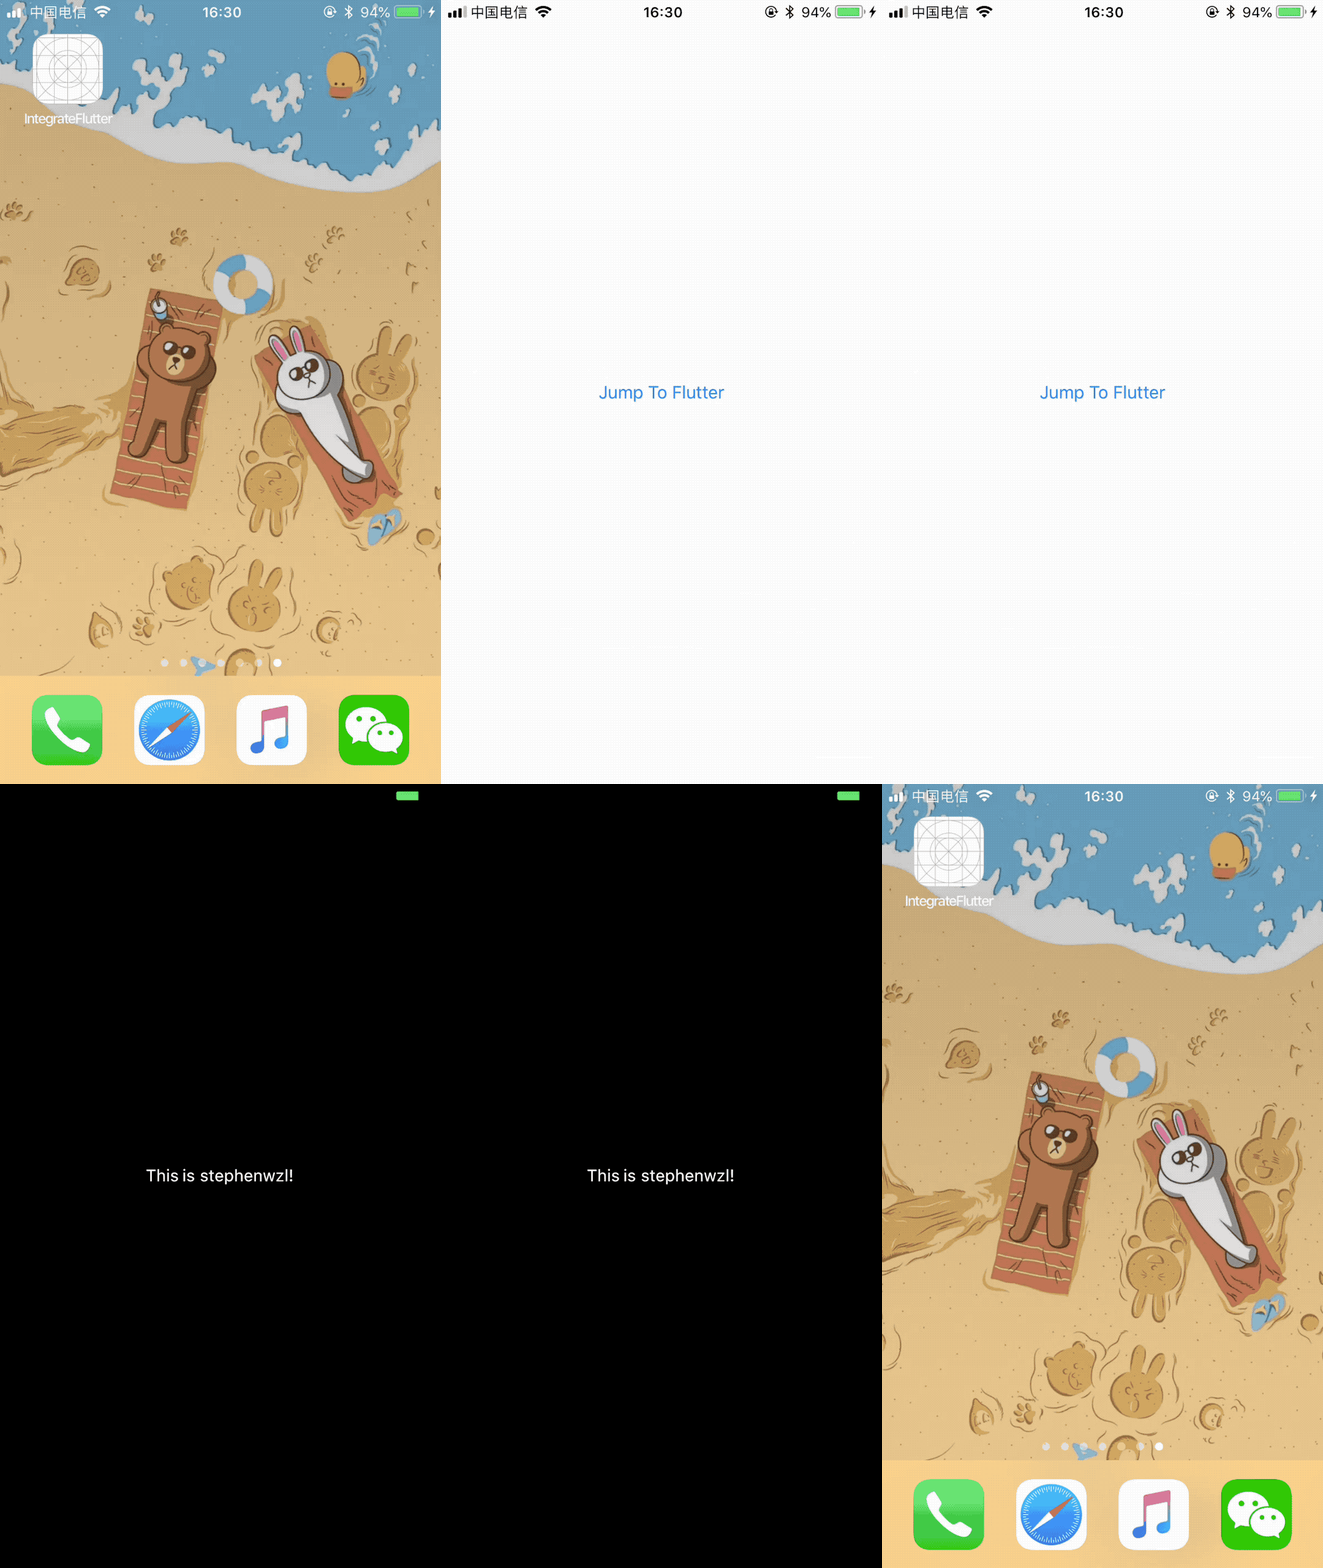
- 编译打包给真机运行,效果如下:

The End
其实 Flutter官方有支持现有 App 集成的计划,并且现在文档也有一部分介绍,但其实整体工具链还没支持上来,目前所支持的程度和上文的方法也大同小异。
如果有需要的话,现有项目完全可以采用上面的方法集成,为了减少工作流程,还需要做一些工作,比如:
- 项目中提供 App.framework 、 Flutter.framework的空壳,方便在 debug 和 release下随时用脚本替换
- Debug时可以先打出包给 Flutter开发者用,也可以直接添加一个 build post action,直接调用 flutter 命令行,把 Xcode和 flutter整合起来,不要像上文一样全都手动,容易漏掉必要流程
- Release AOT的自动化肯定要做,并且要和现有 CI整合

